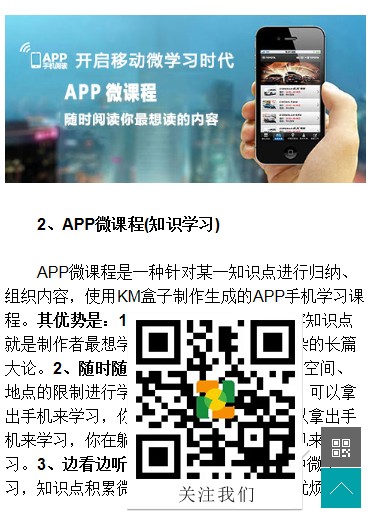
首先看下效果图:
接着我们来讲下实现步骤:
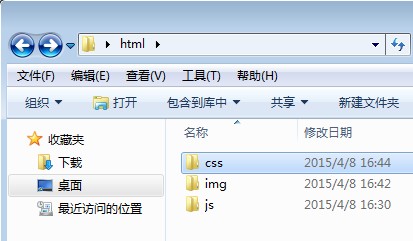
第一步,在桌面上新建一个html文件夹,然后在里新建三个文件夹css、img、js 如下图:
第二步,在css文件夹中新建my.css文件,添加如下代码:
/*mygotop*/
.cbbfixed {position: fixed;right: 10px;transition: bottom ease .3s;bottom: -85px;z-index: 3;cursor:pointer;}
.cbbfixed .cbbtn {width: 40px;height: 40px;display: block;background-color: #02a2aa;}
.cbbfixed .gotop {transition: background-color ease .3s;margin-top: 1px;}
.cbbfixed .gotop .up-icon{float:left;margin:14px 0 0 9px;width:23px;height:12px;background: url(../img/side-icon02.png);}
.cbbfixed .gotop:hover {background-color:#2c2d2e;}
.cbbfixed .cweixin {background: #666666;}
.cbbfixed .cweixin div {background: url(../img/erwei.png);width: 194px;height: 199px;position: absolute;left: -194px;top: -115px;opacity: 0;transform: scale(0);    -webkit-transform: scale(0);transform-origin: 100% 70%;-webkit-transform-origin: 100% 70%;transition: transform ease .3s,opacity ease .3s;-webkit-transition: all ease .3s;display:none\0;*display:none;}
.cbbfixed .cweixin:hover div {display: block;transform: scale(1);-webkit-transform: scale(1);opacity: 1;*display:block;}
.cbbfixed .cweixin .weixin-icon{float: left;margin:12px 0 0 11px;width:18px;height: 18px; background: url(../img/side-icon01.png);}
第三步,在js文件夹中新建my.js文件,添加如下代码:
function mygotop(){
	this.init();
}
mygotop.prototype = {
	constructor: mygotop,
	init: function(){
		this._initBackTop();
	},
	_initBackTop: function(){
		var $backTop = this.$backTop = $('<div class="cbbfixed">'+
						'<a class="cweixin cbbtn"">'+
							'<span class="weixin-icon"></span><div></div>'+
						'</a>'+
						'<a class="gotop cbbtn">'+
							'<span class="up-icon"></span>'+
						'</a>'+
					'</div>');
		$('body').append($backTop);

		$backTop.click(function(){
			$("html, body").animate({
				scrollTop: 0
			}, 120);
		});

		var timmer = null;
		$(window).bind("scroll",function() {
            var d = $(document).scrollTop(),
            e = $(window).height();
            0 < d ? $backTop.css("bottom", "10px") : $backTop.css("bottom", "-90px");
			clearTimeout(timmer);
			timmer = setTimeout(function() {
                clearTimeout(timmer)
            },100);
	   });
	}

}
var mygotop = new mygotop();
第四步,将css文件中用到的图片放置到img文件夹中,图片下载网址:http://www.kmbox.cn/help/gotop/img.zip
第五步,在KM盒子软件设置,自定义设置,自定义资源文件夹处设置我们刚才新建的html文件夹路径。
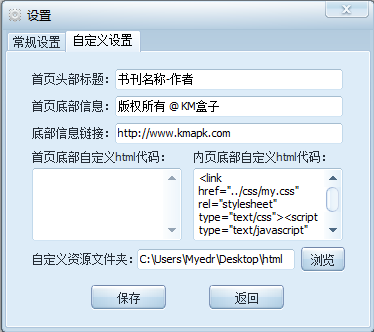
并在内页底部自定义html代码处,添加引用我们刚才新建的css和js文件,引用代码如下:
<link href="../css/my.css" rel="stylesheet" type="text/css">
<script type="text/javascript" src="../js/my.js"></script>
然后保存,返回,这样生成APP时软件即自动将我们自定义的代码文件和资源文件一起打包了。

